Translate

Mostrando postagens com marcador VM. Mostrar todas as postagens

quinta-feira, 3 de abril de 2025

Update script for service model: DIXFService on machine

 Caso encontre o erro Update script for service model: DIXFService on machine ao atualizar uma VM de DEV, faça o seguinte:

Acesse o link abaixo, faça o download do .Net e instale em sua VM:

Download .NET Framework 4.8 | Free official downloads

Reinicie a VM e continue o deploy do pacote via LCS!

segunda-feira, 31 de março de 2025

VHD 10.0.43 D365F&O

 Olá pessoas,

Está disponível para download o VHD do D365F&O na versão 10.0.43. Os arquivos foram disponibilizados no dia 28/03/2025.

Corre baixar o seu antes de acabe!


Shared asset library -- Microsoft Dynamics Lifecycle Services


quinta-feira, 20 de fevereiro de 2025

My DEV Virtual Machine

Here is how I create "MY" DEV VM for the D365F&O. 

There are a lot of different tutorials, tips, and tricks on how to improve the performance of the VM. This one works a lot for me. I hope it helps you, too!


LCS Cloud Hosted Environment Creation.

Go to your LCS Cloud Hosted Environment pages and click the + icon to add a new CHE.


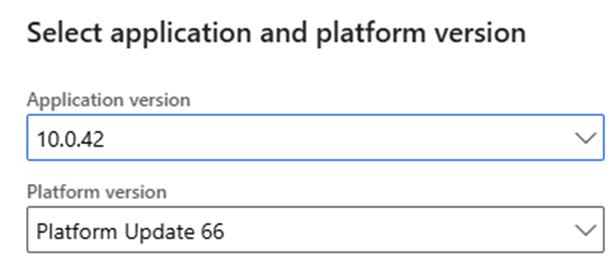
Select the version you need and click Next.


Choose the  “DEVTEST” type and click Next.

Now choose the “Develop” type and click Next.


Select your Azure subscription and click Next.


Please type the name of your CHE and choose its size. I suggest you use the DS12v2. It is a good size, and with some changes, you will have excellent performance at a reasonable price. After that, click on the “Advanced Settings” button.


In the Advanced Settings, go to the “Disk space configuration” and change the number of disks to 2, which is the minimum. Change the size to 127GB. Don´t worry about it now because the D365F&O database will be moved to a different disk in the following steps.


In the “Customize virtual machine names,” type the name of your CHE again. This way, the name on the LCS CHE page will match the name of the VM in the Azure portal.


After that, mark the checkbox and hit Next. The LCS will start creating the VM in the Azure Virtual Machines area.


Azure Virtual Machines Changes

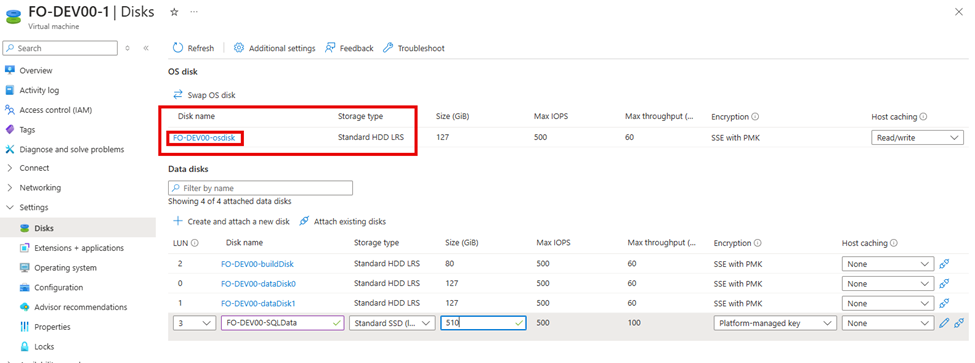
Open the Azure Portal, go to the Virtual Machines, and open the VM configurations created. Go to Settings > Disks and click “Create and attach a new disk.”


Type the disk's name and choose the size according to the size of the D365F&O database in your production environment. At the first moment, thinking about the first restore of a .bacpac file, I suggest you choose the SSD disk type. You can always change it whenever you need to. Click on the Apply button to save the changes.


With the VM deallocated, click on the “OSDISK”:


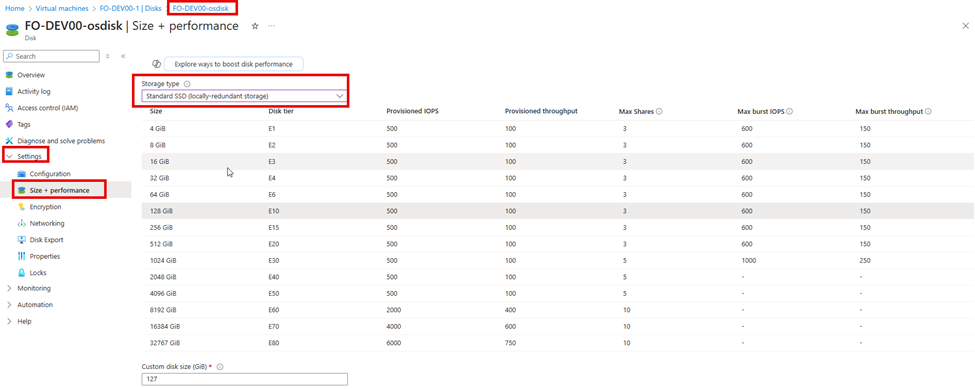
Now go to the OSDISK Settings, click the Size + Performance option, and change the “Storage type” from HDD to Standard SSD. This will significantly improve the performance of the Windows Server and, especially, Visual Studio!


Save the changes and start the Virtual Machine!


Virtual Machine internal changes.

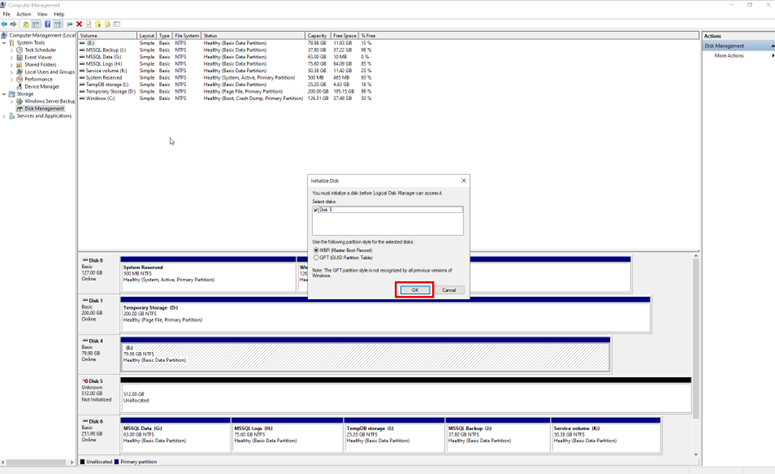
After connecting to the VM through RDP, the first step is to stop all the FO services. With all the services stopped, open the Computer Management and click the Disk Management option. You will see a message related to the new disk we created. Click OK to initialize the disk.


Right-click over the new Disk 5 and choose “New Simple Volume.”


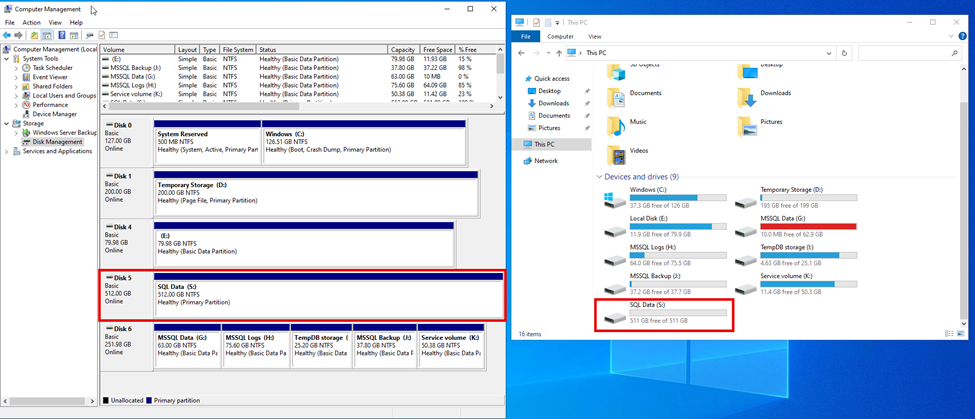
 Follow the wizard, choose the size, the letter for use in the new disk, and the disk's label. This is the result:


The new SSD disk will receive all the database files. Create folders inside this new disk according to your preference. In the next step, we will move the database files from the G, H, and J disks to the new SSD disk, which in this tutorial is disk S:

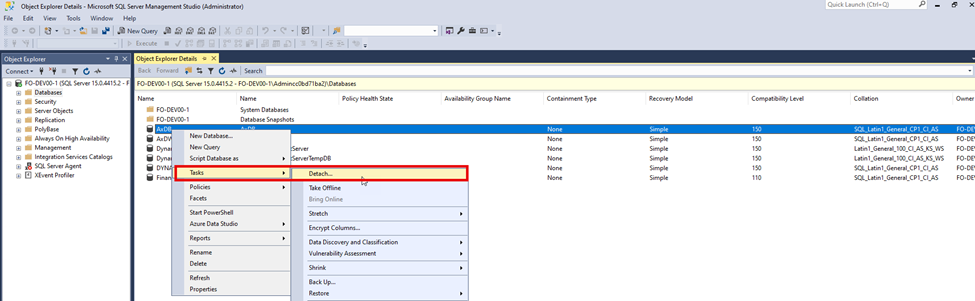
With all the D365F&O services stopped, open your SSMS and, detach all the databases, repeat the Dettach process to all the available databases:


With the SSMS empty, let's move the files:


Open the folders and copy\cut the MDF and LDF files from the “old disks” to the newly created disk:


While copying the files between the folders, open the SQL Server's “Properties” and change the database files' default folder. I am using a “SQL Backup” folder inside the K disk. In the next step, you will understand why. But you can choose any other disk that suits your preference!


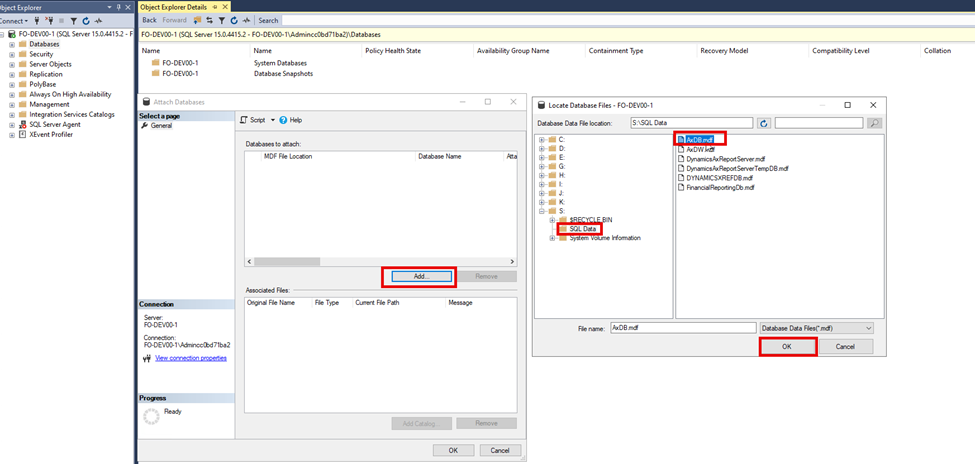
After to copy all the files, let´s attach the databases:


Repeat the attach process to all the databases; we will see the following screen at the end. Click ok and wait for it to finish.


Now we have all the databases online again:


Restart your Virtual Machine. When you connect again, all the services will be running. Validate the FO, open Visual Studio, and run your tests. If there is no issue, let's move to the last step.

The last step is to adjust the disk size. Here is what we have now:


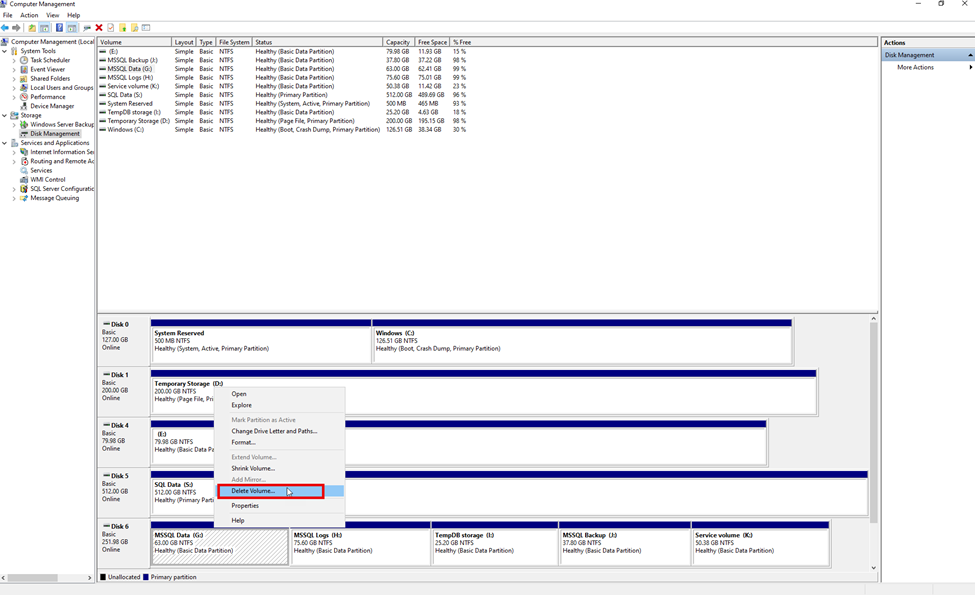
You can see that the K: drive does not have enough space. Open the “Computer Management” and “DELETE” the G, H, and J drives that are now totally empty:


Here is what we have after deleting the partitions:


Now we just need to extend the K partition, right-click on it, click extend, and follow the wizard:


    Here is the final result:


Now, the Virtual Machine is ready to be used with much disk space. The C: drive is an SSD type, giving S.O. and Visual Studio good performance. The database disk is SSD, also. Remember that you can change the disk type to HDD at any time to decrease the cost of the VM!

sábado, 15 de fevereiro de 2025

D365FO - Virtual Machine 10.0.41

 Boas pessoas,

Aos que utilizam maquina virtual localmente, em seus laptops, PCs ou servidor próprio, está disponível no LCS o VHD na versão 10.0.41!


Acessem a Shared Asset Library para fazer o download!

Vamos estudar e trabalhar pessoal!

O café ta caro!


sexta-feira, 7 de junho de 2024

D365F&O - Usuário bloqueado na VM de DEV.

Aos DEV´s,
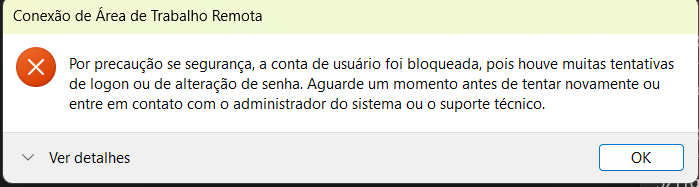
É comum receber a seguinte mensagem de erro ao tentar acessar sua VM hospedada no Azure:


Dificil dizer a razão exata pra este prolema, mas a mensagem de erro no dá uma direção... Sugiro que utilizem meios mais seguros de acessar sua VM tais como:
  • Porta RDP diferente:
  • White List Firewall
  • Bastion(Péssimo pra DEV)
  • Azure Network diferente
  • VPN
Enquanto isso, vamos de "solução paralela não documentada" mesmo...

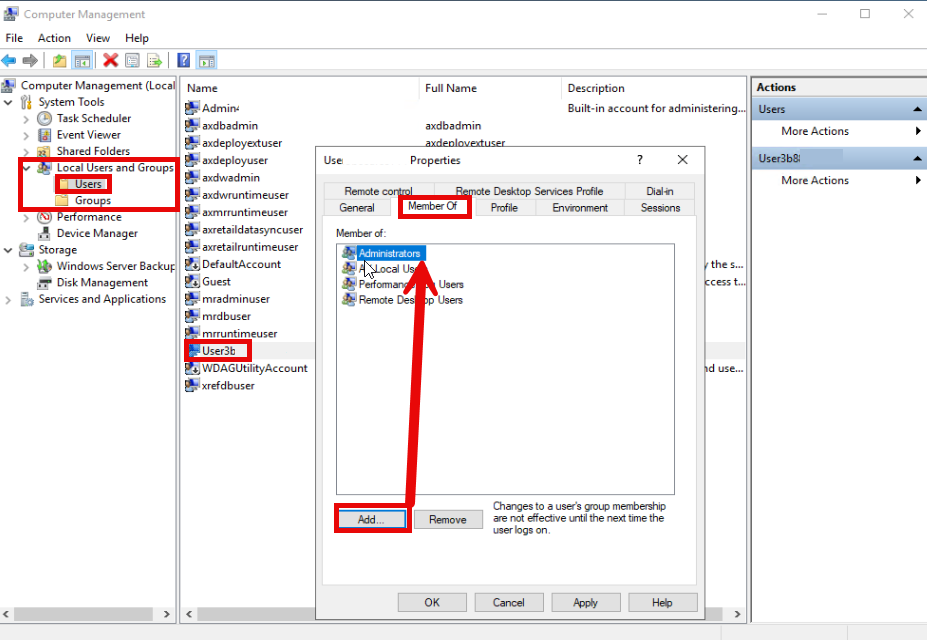
O erro menciona a impossibilidade de se conectar à VM utilizando a conta "admin", mas sabemos que no LCS temos tanto a conta "admin" quanto a conta "user"... Acesse a VM utilizando esta conta secundária e abra o Computer Management (compmgmt.msc) do Windows "Como Admin":


O mesmo resultado é obtido usando o "lusrmgr.msc"... eu só acho o commgmt mais completo!

Ao executar como "admin" será solicitada a senha da conta "admin"... Digite-a pacientemente e com cuidado para não errar essa senha monstruosa... Isso funciona pois a conta está bloqueada para acesso remoto (Sessão Interativa), mas ela não foi desativada, assim ainda é possível utiliza-la para tarefas administrativas!


Após inumeras tentativas de digitar a senha correta você terá acesso ao painel de administração do servidor... expanda a opção de usuários e adicione este "user" ao grupo admin:

Faça o "Sign out" e depois acesse a VM novamente, agora o "User" é um Admin.

Abra o "GPEDIT.MSC" e expanda as opções conforme a imagem abaixo... No lado direito da tela altere as opções conforme você achar melhor, você pode até desativar todas elas e assim evitar que as contas sejam bloqueadas novamente!


Resolvemos o problema de conta bloqueda? SIM!
Foi a melhor solução possível? DEFINITIVAMENTE NÃO!

Oque fizemos é tão seguro e inteligente quanto usar o CPF como chave PIX... coisa de gênio!!!
Obs: Quem me manda CPF recebe de presente inscrição pra ser mesário nas eleições!!!

Temos agora DUAS contas ADMIN e nenhum sistema de bloqueio de tentativas erradas de acesso... prato cheio pra "força bruta"... Acham isso seguro?

Sugiro que utilizem outros métodos que mencionei no inicio do post!

Se precisatem, me chamem!

domingo, 26 de maio de 2024

D365F&O VM Local 10.0.39

Turma, "novidade novinha ein"!!!

Está disponivel para download pelo LCS a VM na versão 10.0.39. Vai la no seu Shared Asset Library e aproveita!


Destaques para:

SSMS v20.1
SQL Server 2022
Visual Studio 2022

O Windows Server já é o 2022 nas VM´s anteriores!

Ainda não tem o Power Platform Extensions, em outro post vou mostrar como preparar o VS para a "Unified Developer Experience", tanto na VM disponibilizada pela Microsoft quando em um VS2022 instalado localmente em seu dispositivo!


sexta-feira, 29 de julho de 2016

Microsoft Dynamics AX7 - Acesso inicial!!!

Neste post vou mostrar a maneira que utilizei para efetuar o acesso ao Microsoft Dynamics AX7 utilizando a Maquina Virtual baixada do site Microsoft Partner Source.

Esta versão do Dynamics AX pode ser utilizada por clientes e parceiros Microsoft, ela somente pode ser utilizada para fins de treinamentos e demonstração e suas informações de acesso, tais como usuários e senhas, não podem ser divulgadas para outros que não sejam clientes ou parceiros Microsoft!

Para se inscrever e estar apto a acessar e testar o Dynamics AX 7 consulte as dicas deste link.

Há a possibilidade de utilizar o Dynamics AX7 no Azure ou mesmo efetuar o download do VHD e configura-lo em um Hyper-V local.

Após me registrar corretamente seguindo as orientações dos links acima eu optei por efetuar o download do VHD e configura-lo em meu servidor!

Após a configuração no Hyper-V e acessar o servidor eu cliquei no ícone que estava disponível na área de trabalho da VM.


Neste campo devemos inserir o e-mail utilizado durante o processo de registro para uso do AX7. No meu caso eu inseri o e-mail criado no domínio @onmicrosoft.com. Esta foi a conta que utilizei para acesso ao Office365 e é esta a conta que será utilizada para a administração de usuários no AX7, somente via painel de controle do Office 365 é que será possível adicionar novos usuários ao AX.
Após clicar em Submit aguarde o processo e após isso você poderá acessar o Internet Explore e abrir a URL para o AX7. No meu caso esta URL já estava salva no histórico do IE e isso facilitou! Depois eu apenas criei um atalho na area de trabalho utilizando esta URL!

A tela inicial do Microsoft Dynamics AX é a seguinte:


E a partir desta tela teremos acesso a todas as demais opções desta nova versão do Microsoft Dynamics AX!

No próximo post tem mais!